
Login to Orchestrator
- Open a browser and go to the UiPath Automation Cloud https://cloud.uipath.com
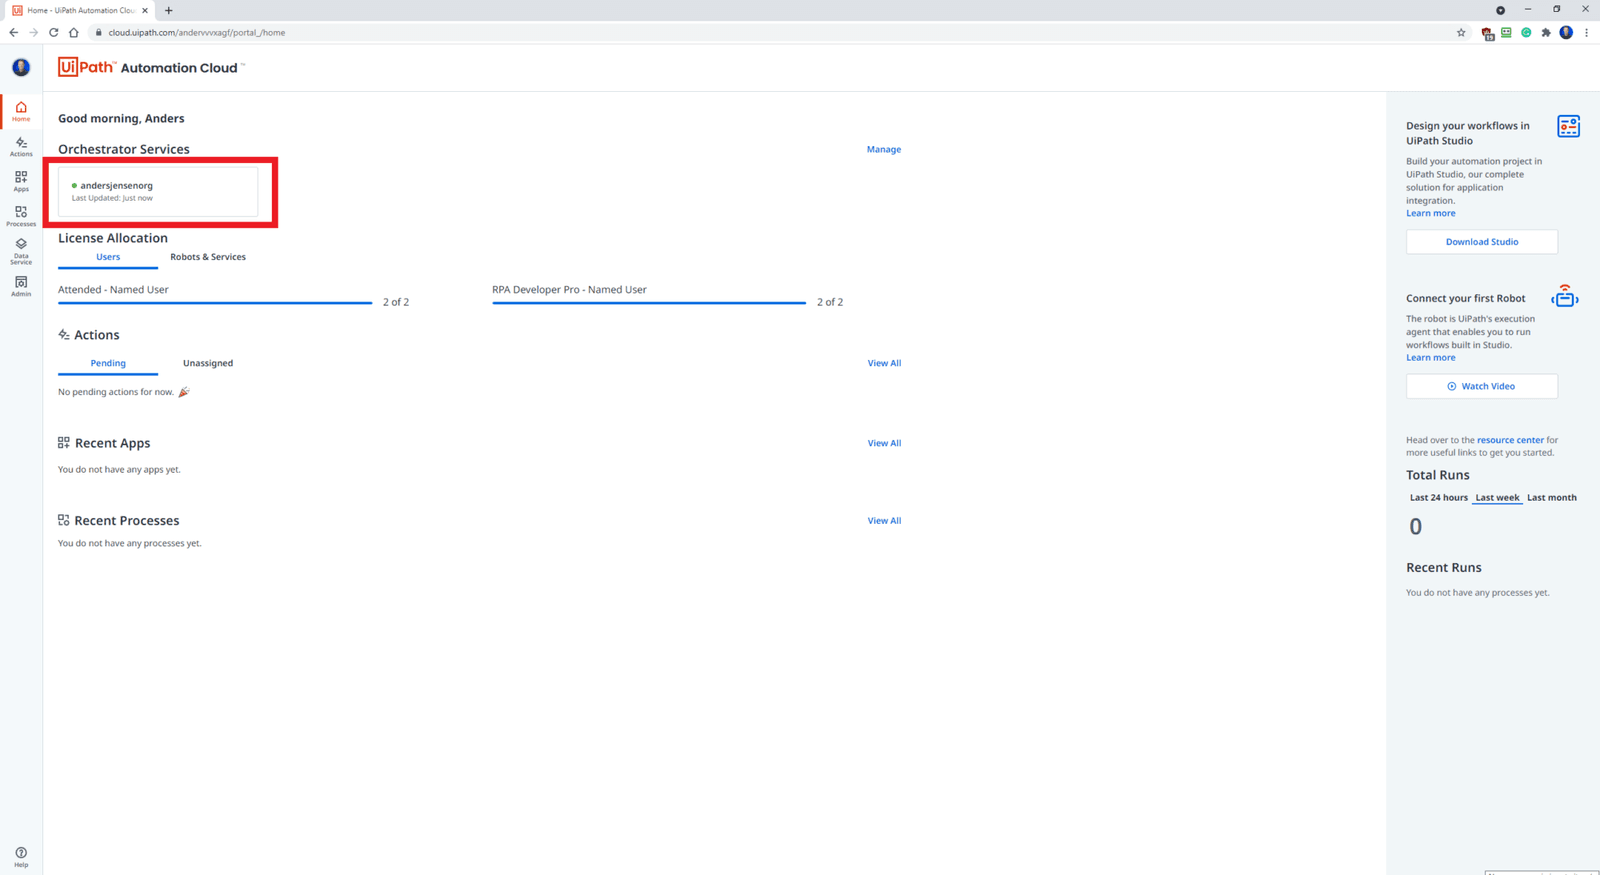
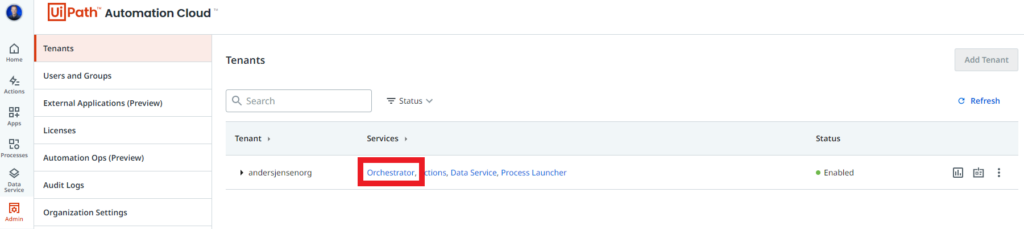
2a. Under 'Orchestrator Services', click your tenant (Fig 1.1). You're now logged into UiPath Orchestrator and can go to Step 3. If you couldn't do this, go to Step 2b.
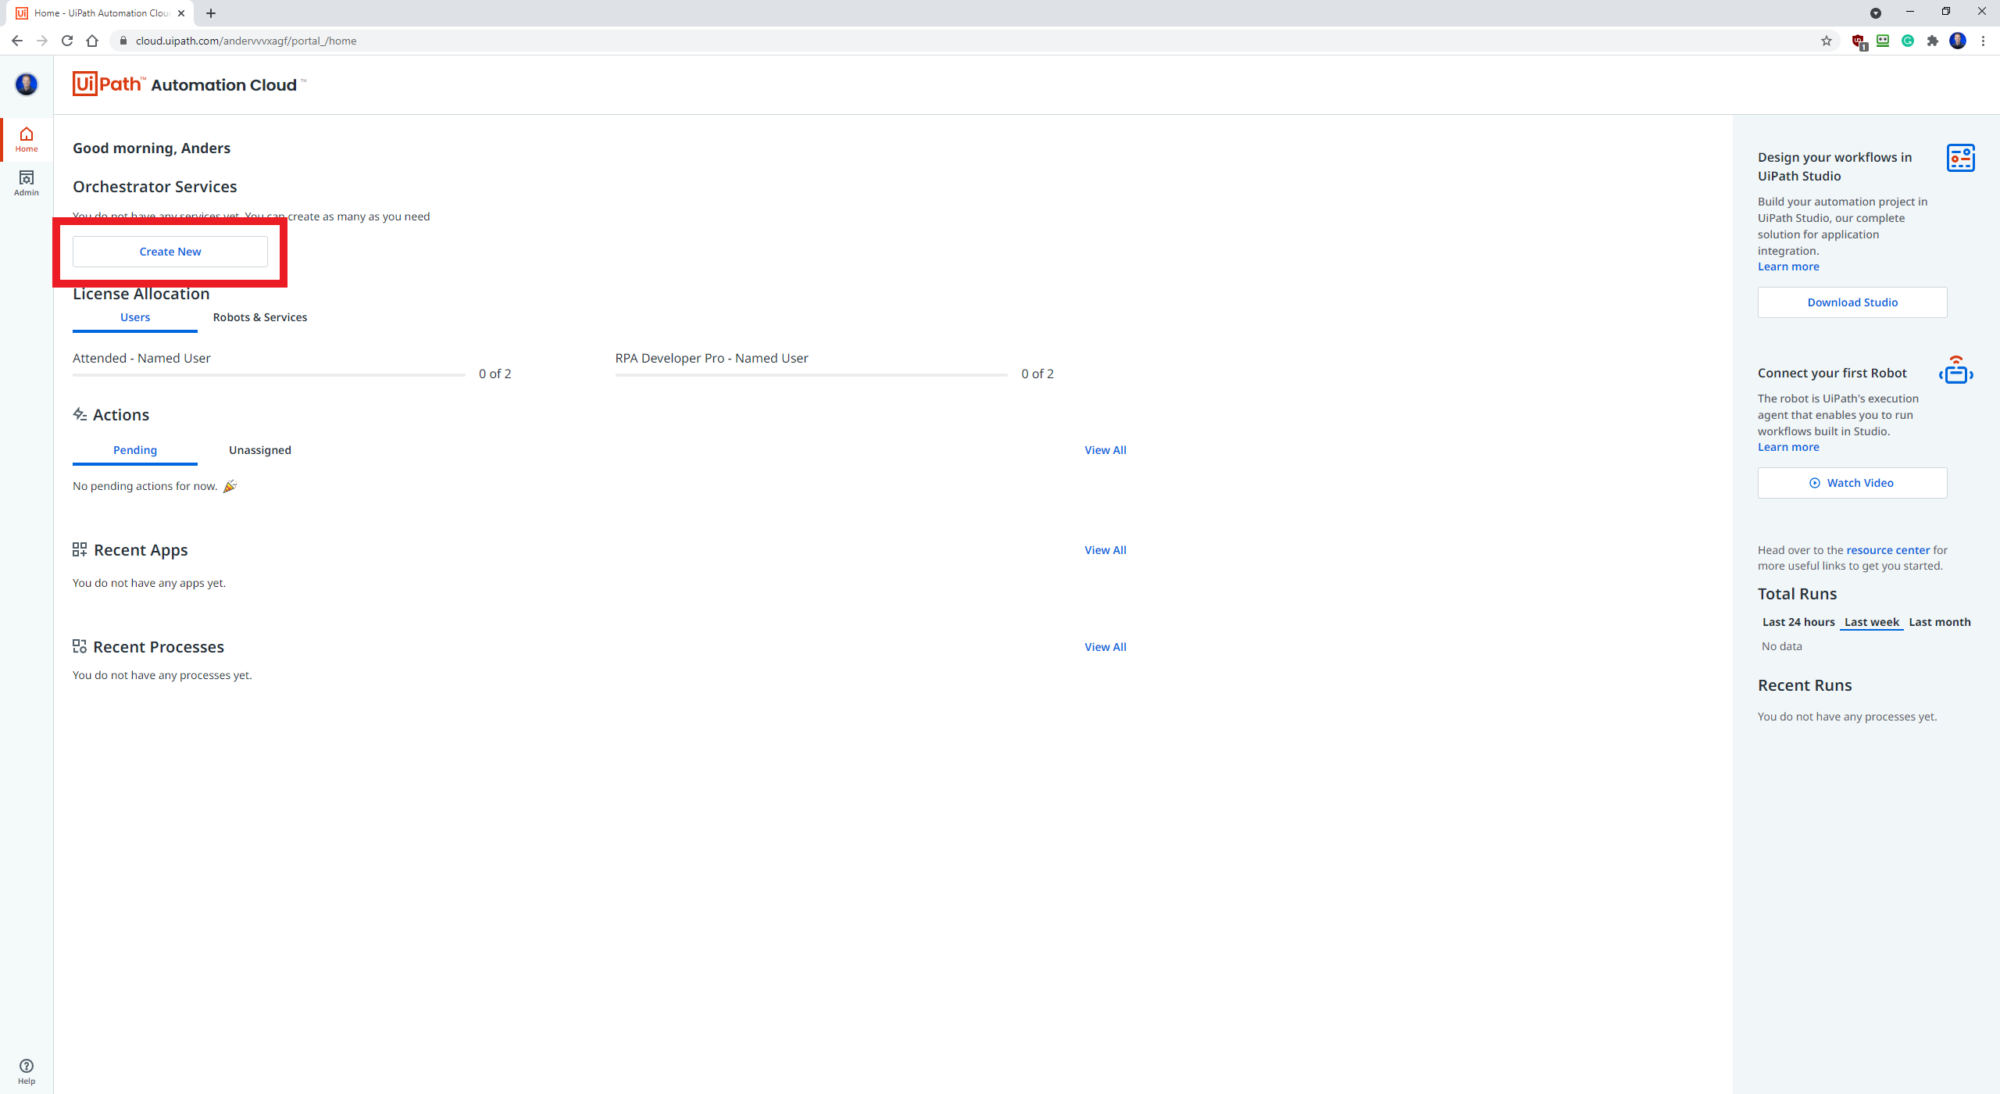
2b. In case you see the 'Create New' under Orchestrator Services (Fig 1.2), it means you haven't created a tenant yet. Don't worry; we'll do that very easily. Click 'Create New'.
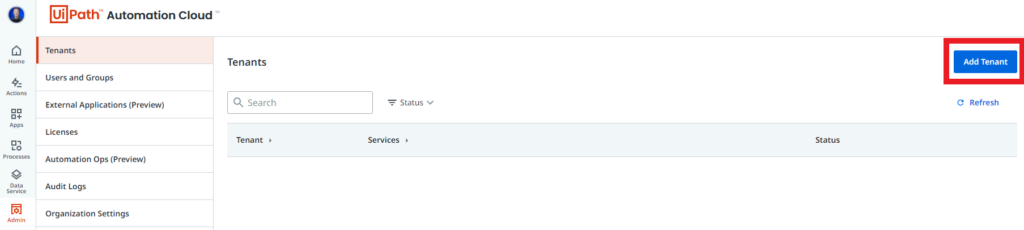
2c. Click the blue 'Add Tenant' in the upper right corner.
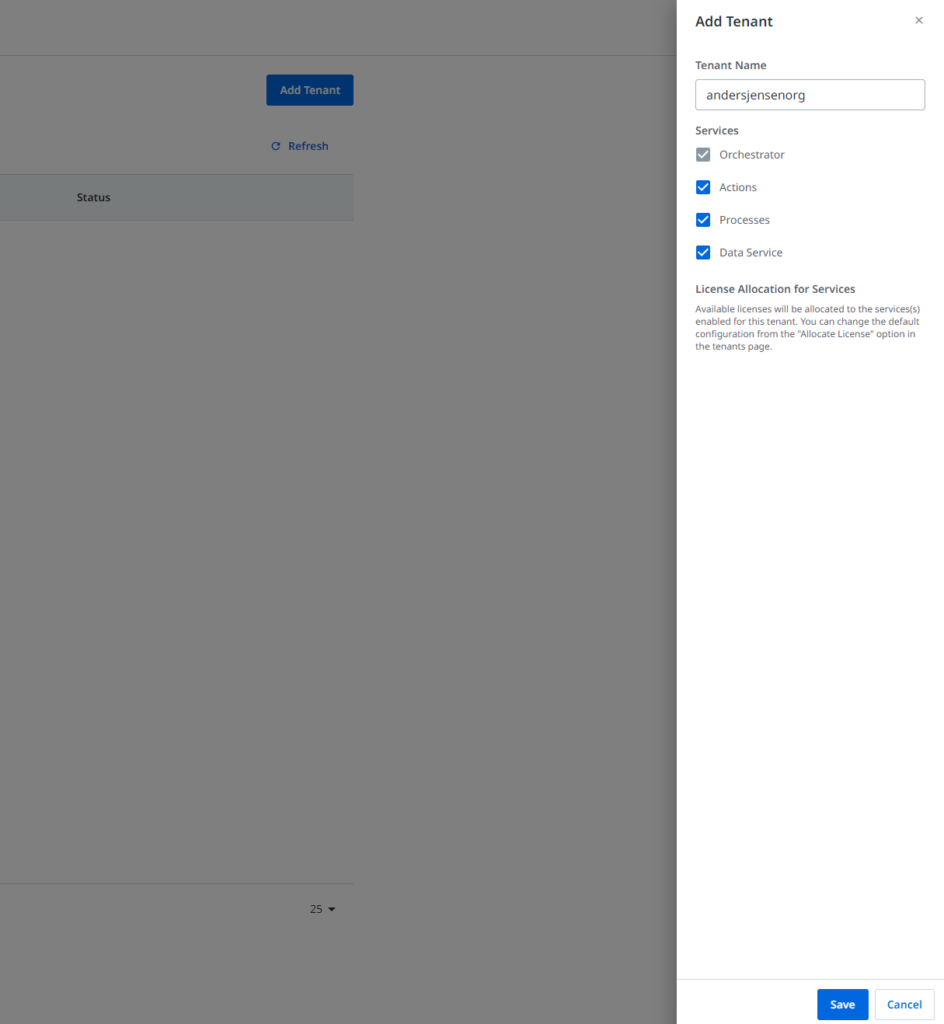
2d. A pop-up window will open to the right (Fig 1.3). Give your tenant a name. Make sure you have ticked 'Actions' and 'Processes'. 'Data Service', which is an easy and secure way to store your business's data, is optional, and it doesn't matter to this guide (if you untick, you can very easily tick it later). Remember to click the blue 'Save' in the lower right corner.
2e. The tenant is created and click the blue 'Orchestrator' next to your tenant name to enter UiPath Orchestrator.
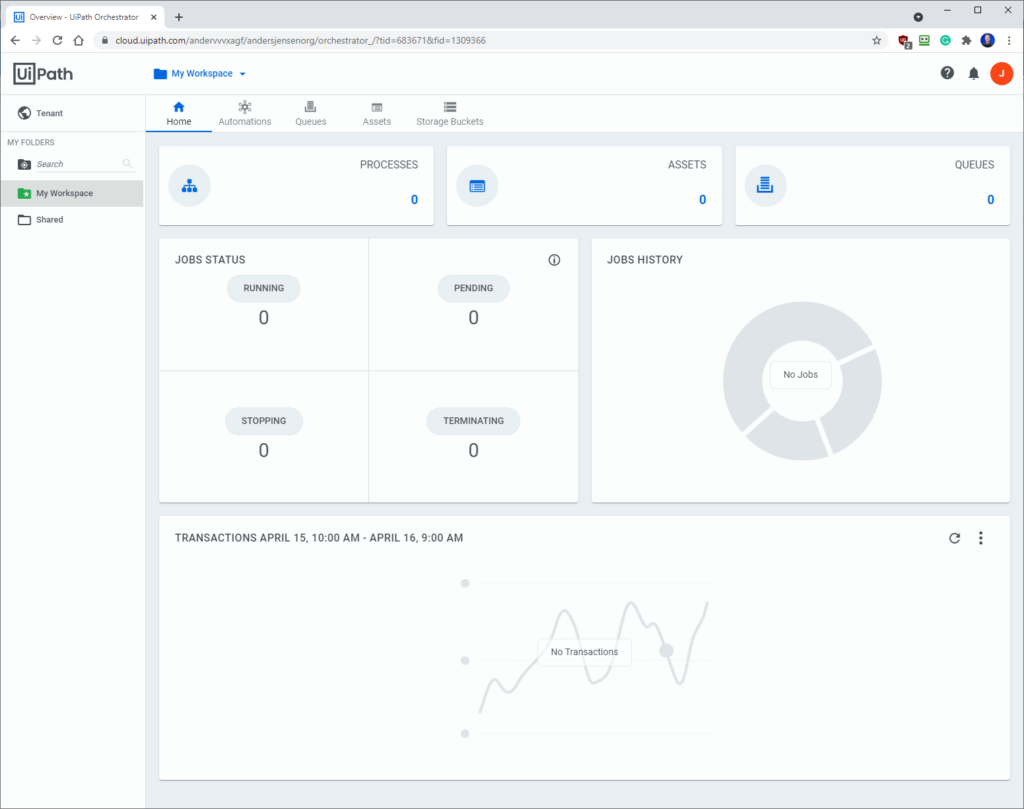
3. You're now logged into UiPath Orchestrator.
Connect UiPath with Orchestrator
The connection between Orchestrator and UiPath/a robot can be made manually or automatically. This guide will show how to do it automatically since we try to avoid manual work.

- Go to your start menu (Fig. 2.1).
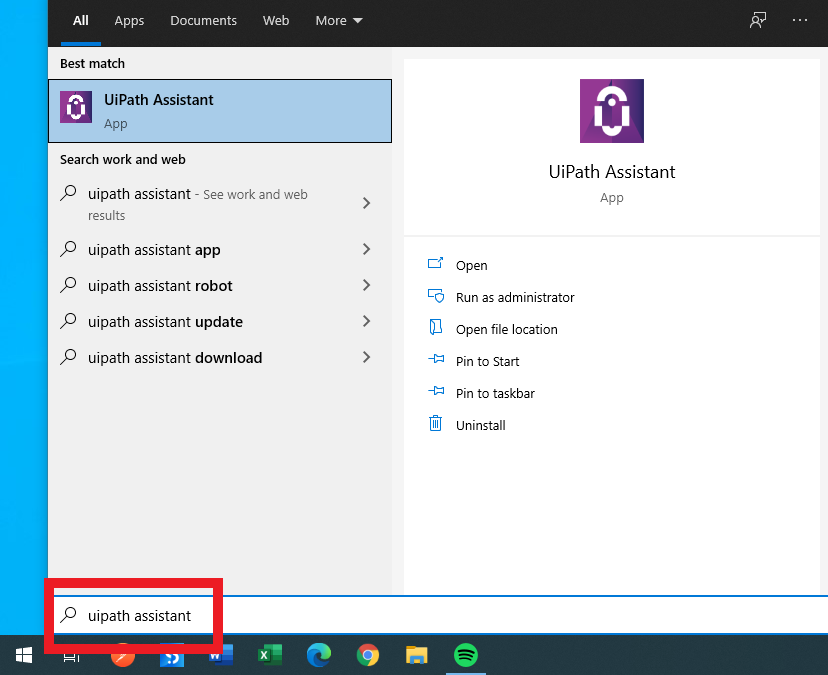
2. Type "UiPath Assistant" and open the application (Fig. 2.2).
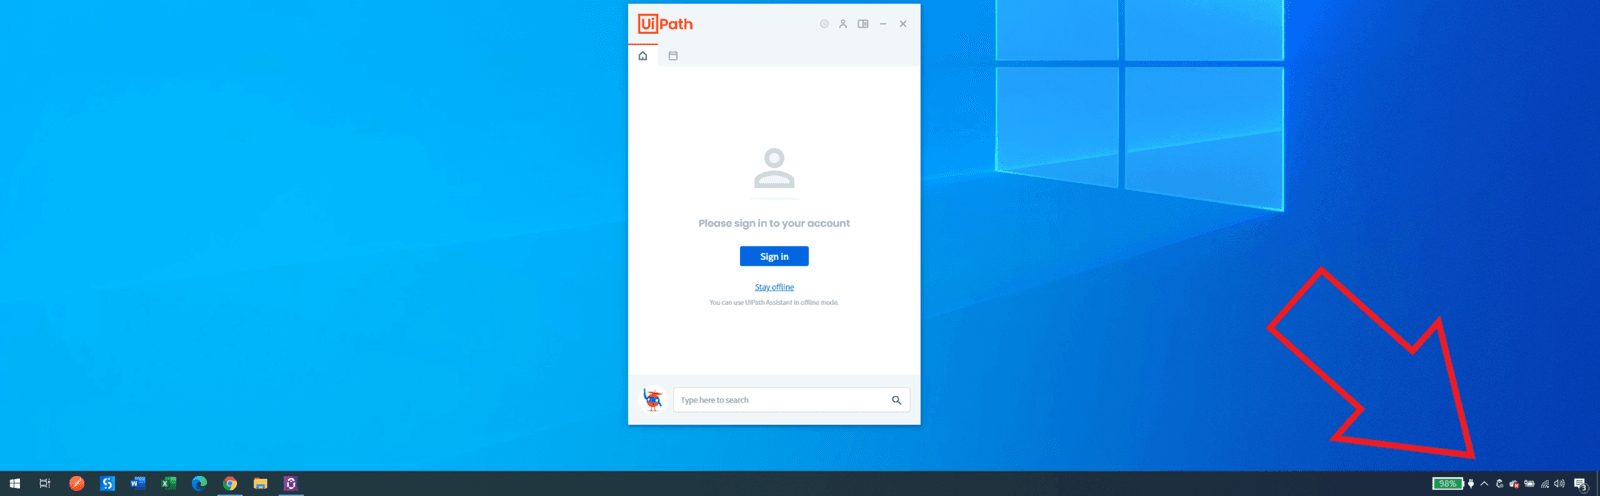
3. UiPath Assistant will now be visible. If not go find it in the Windows tray (red arrow in Fig. 2.3).
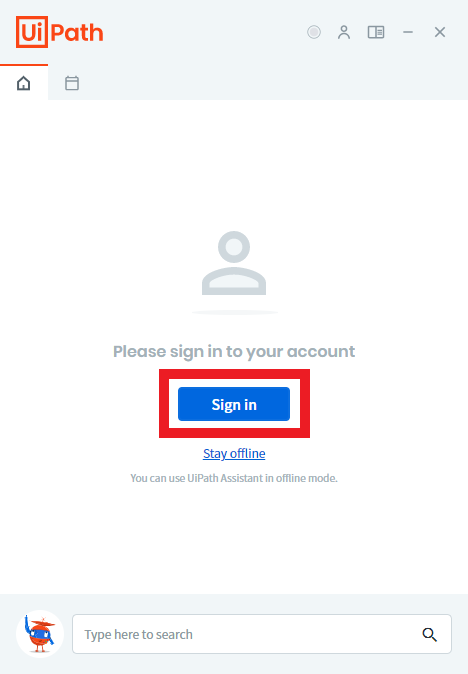
4. Click the blue 'Sign In' button (Fig. 2.4) and a browser will open.
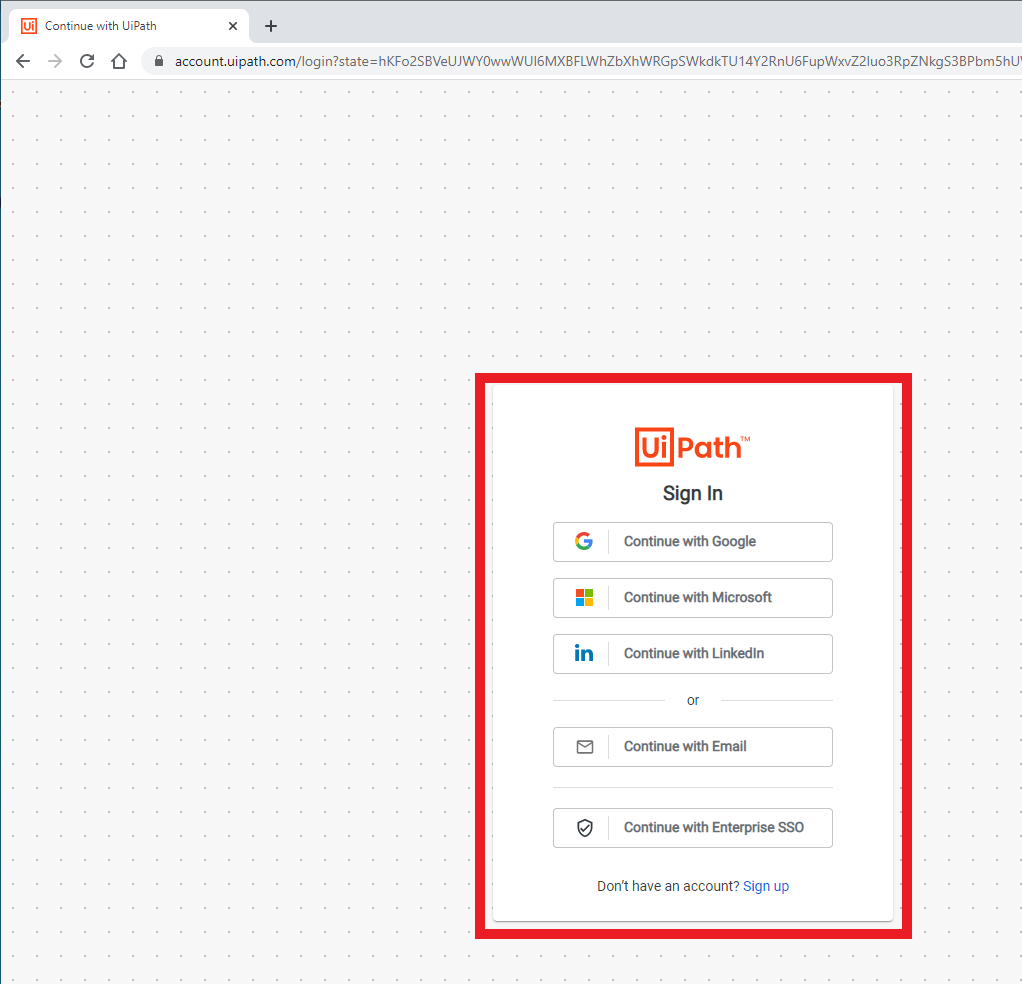
5. Sign in to your UiPath account, you've created when you've downloaded UiPath (Fig. 2.5).
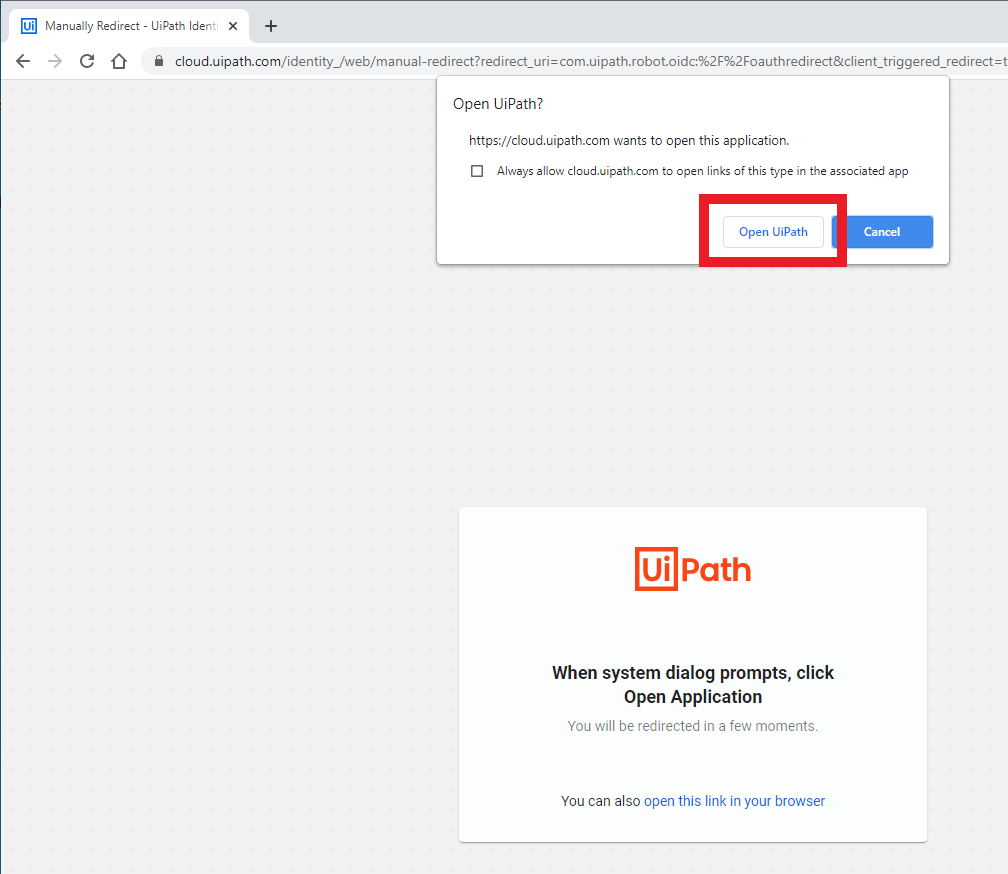
6. Click 'Open UiPath' in the pop-up message in your browser (Fig. 2.6).
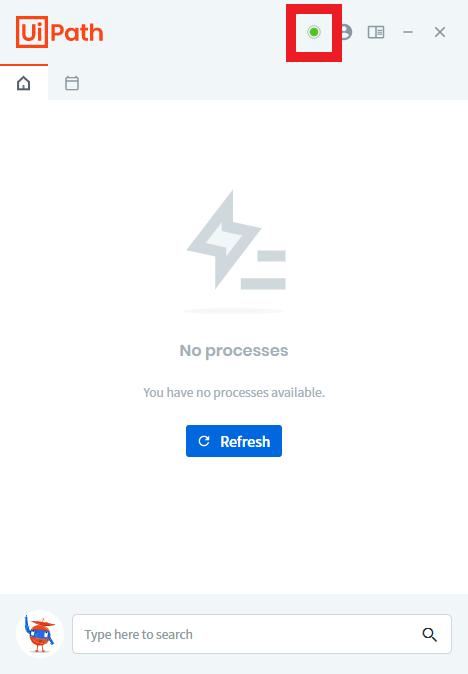
7. If you see the green light in your UiPath Assistant (Fig. 2.7), you have now successfully connected Orchestrator with UiPath and are ready to run your robots. If you see an error message, please go to User authentication troubleshooting below and solve it.
User authentication troubleshooting
If you get the error message "Interactive sign-in is not enabled for this tenant, Enable it from the Orchestrator settings, or connect using the machine key", we need to enable the interactive sign-in.
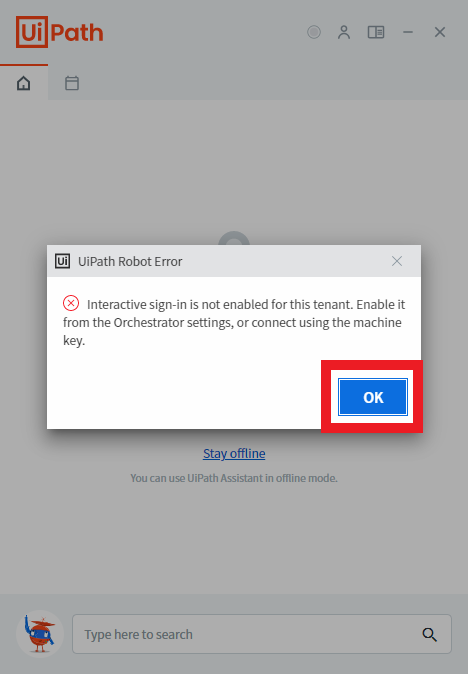
- Click 'OK' to the error message (Fig. 2.8). Then open a browser and go to https://cloud.uipath.com.
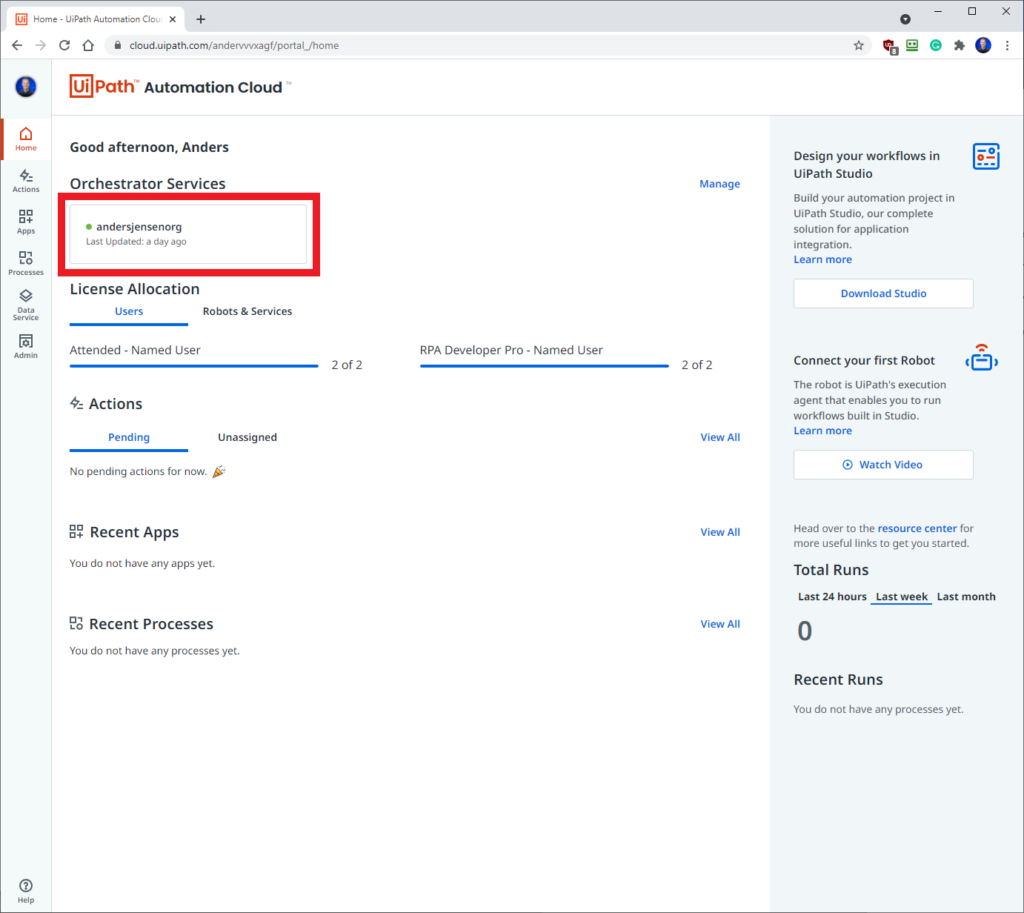
2. Click your tenant (Fig. 2.9).

3. Make sure you click the 'Tenant' in the upper left corner and then 'Settings' in the upper right corner (Fig. 2.10).
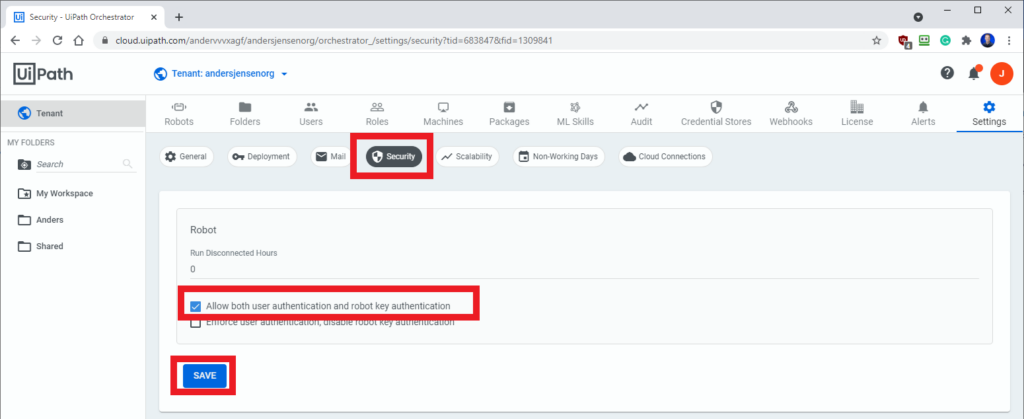
4. Click the 'Security' button, then make sure 'Allow both user authentication and robot key authentication' is activated, and finally click 'SAVE'. You can now take this chapter again and succeed in automatically connecting Orchestrator and UiPath.
Publish a project to Orchestrator
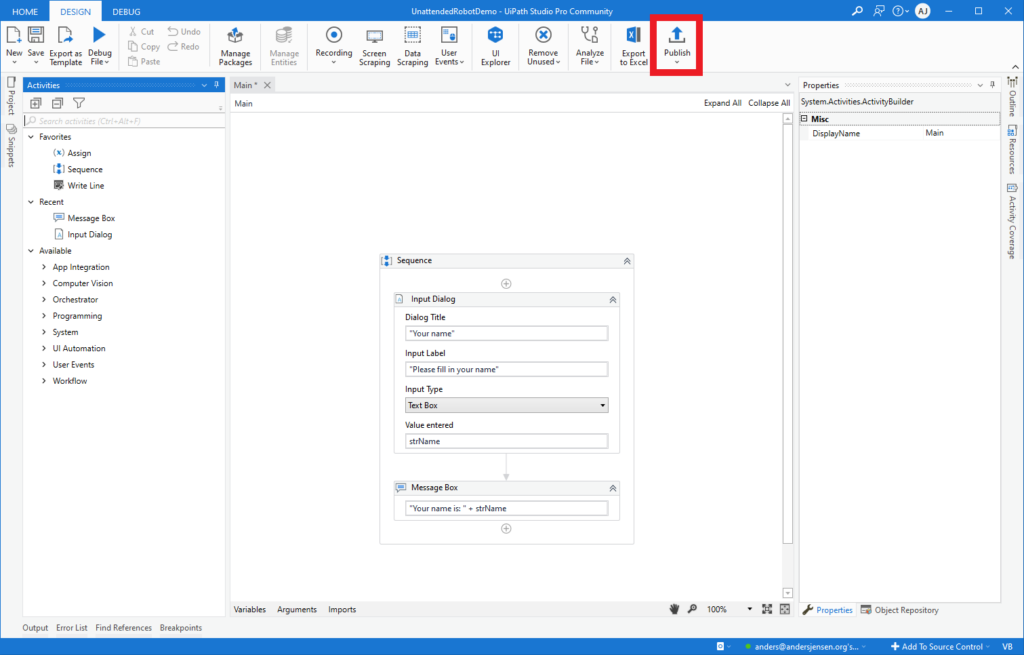
- Create a workflow in UiPath Studio. I'm using this workflow with an Input Dialog and a Message Box to show later that we have a connection both ways. When you're done with the first version, click 'Publish' (Fig 3.1).
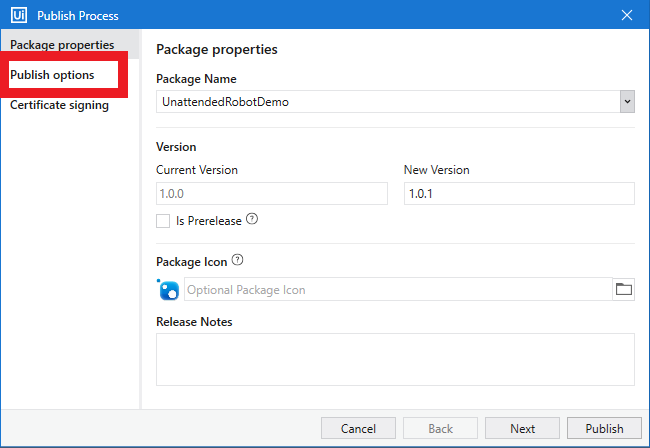
2. Give your package a name (or leave it the same as your workflow). You can choose an optional icon for better identification later in Orchestrator and release notes. When finished, click 'Publish options'.
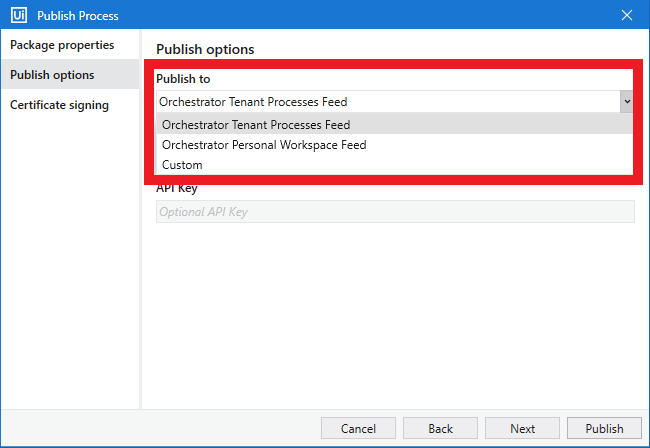
3. In the 'Publish to' click the dropdown menu, choose 'Orchestrator Tenant Processes Feed' and click 'Publish' in the lower right corner.
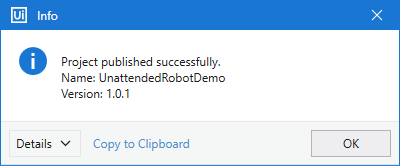
4. You've now published your project to Orchestrator.
Assets
An asset is stored in Orchestrator. That can be a name (e.g. NewsletterURL) and a corresponding value (e.g. https://andersjensen.org/email-newsletter). This asset can be retrieved by multiple UiPath workflows. What's even more useful is that assets can be stored as a credential (username/password) and securely stored in Orchestrator (encrypted with AES 256). Once a password is typed in for a credential asset, it can be accessed further - convenient if multiple users have access to the same Orchestrator tenant.
String Assets
Create a string asset in Orchestrator
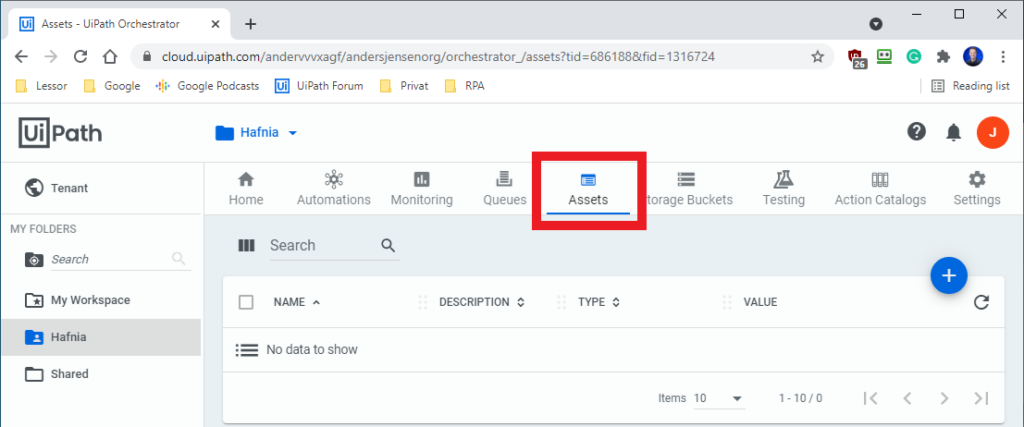
- Assets can be limited to a folder or can be shared amongst folders. Here an asset in the Hafnia folder is created. In your chosen click 'Assets' (Fig. 4.1).
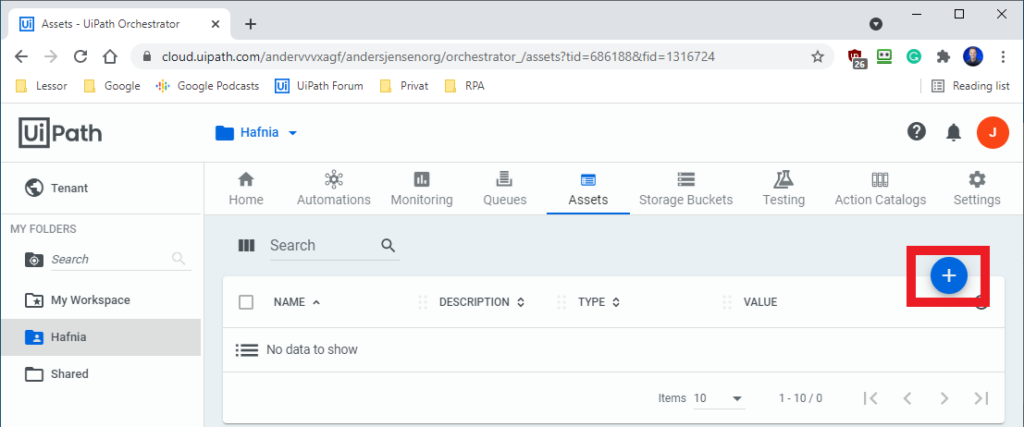
2. Click the blue/white '+' icon to the right (Fig. 4.2).
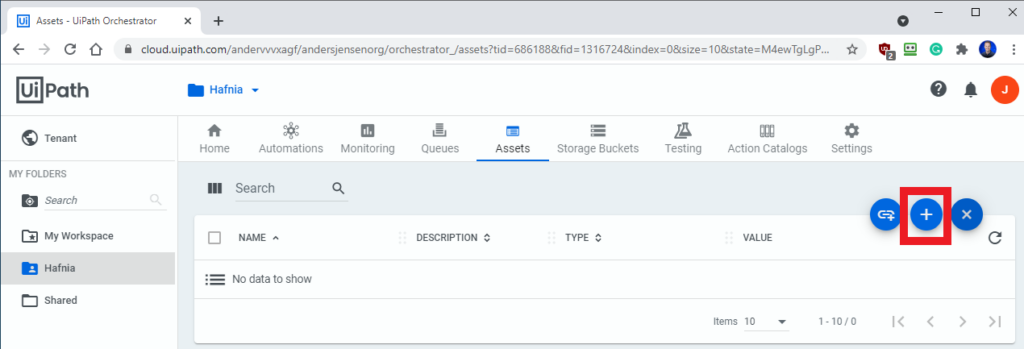
3. To add a new asset click the blue/white '+' icon again (Fig. 4.3).
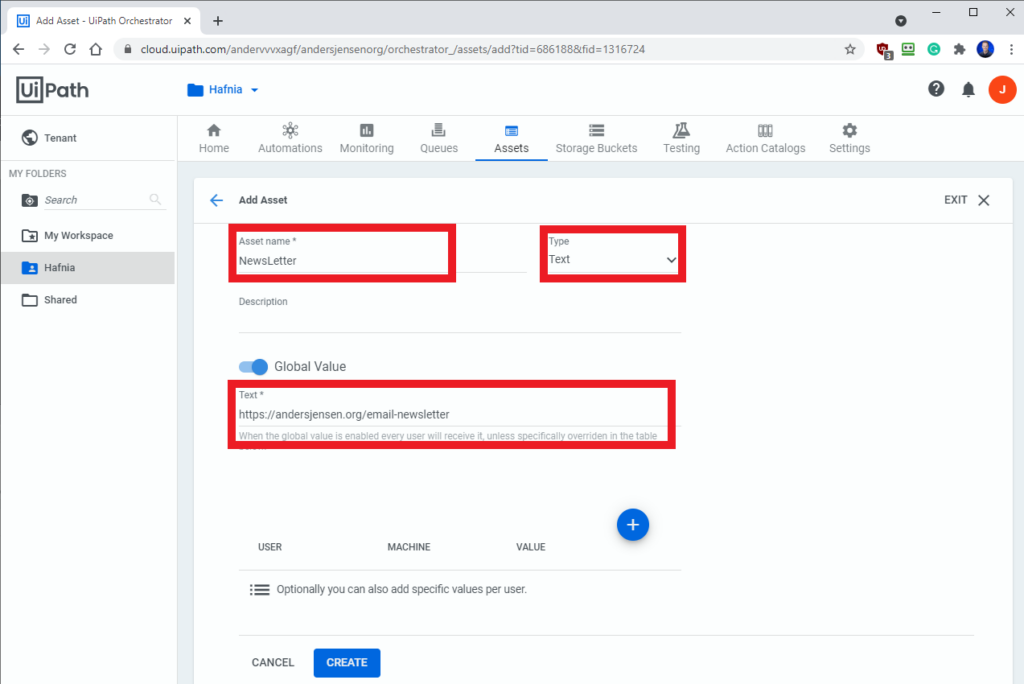
4. Now, fill in the name you want to give your asset in 'Asset name' (Fig. 4.4). Please give it a describing name. I've chosen the name "NewsLetter". In the drop-down menu, choose "Text" as the type. Text here is the same as a string in UiPath/.NET. The description of your asset is optional. If Global Value is enabled, every user will receive the asset unless overridden in the table below. If Global Value is disabled, only the users specified in the table below will receive it. Under 'Text *', fill in the value of your asset. That could, e.g., be a folder name or a phone number that you want to share among projects. When finished, click 'Create'.
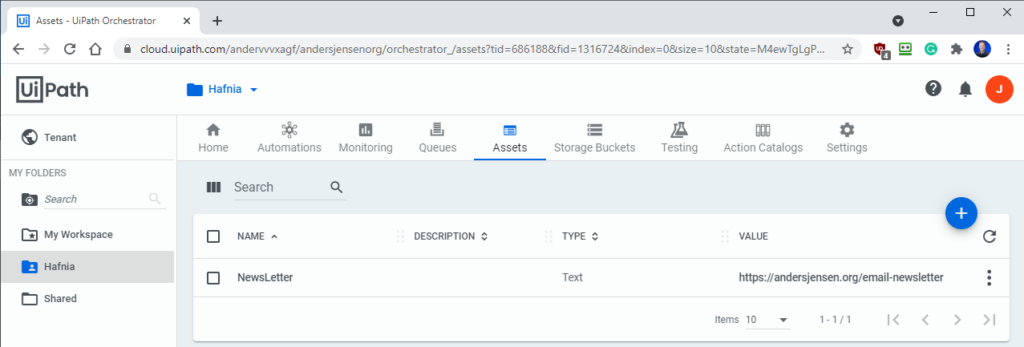
5. Your asset is now created and you can call it in UiPath by referring to its name "Newsletter" (Fig. 4.5).
Credential Assets
Create a credential asset in Orchestrator
- Assets can be limited to a folder or can be shared amongst folders. Here an asset in the Hafnia folder is created. In your chosen click 'Assets' (Fig. 4.6).
2. Click the blue/white '+' icon to the right (Fig. 4.7).
3. To add a new asset click the blue/white '+' icon again (Fig. 4.8).
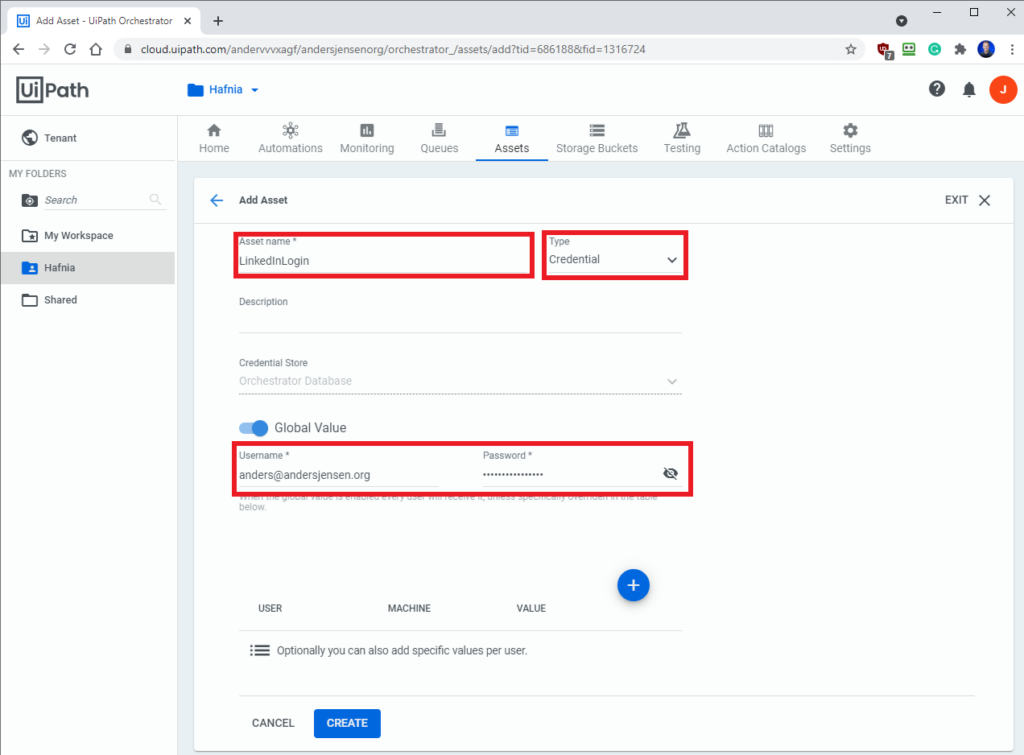
4. Give your asset a name (Fig. 4.9). This is the name you will use in UiPath to get the Asset from Orchestrator. In the drop-down menu, choose "Credential" as the type. You can give the asset an optional description. If Global Value is enabled, every user will receive the asset unless overridden in the table below. If Global Value is disabled, only the users specified in the table below will receive it. Under "Username*" and "Password*" specify the username and password you want to use in the credential asset. When finished, click 'Create'.
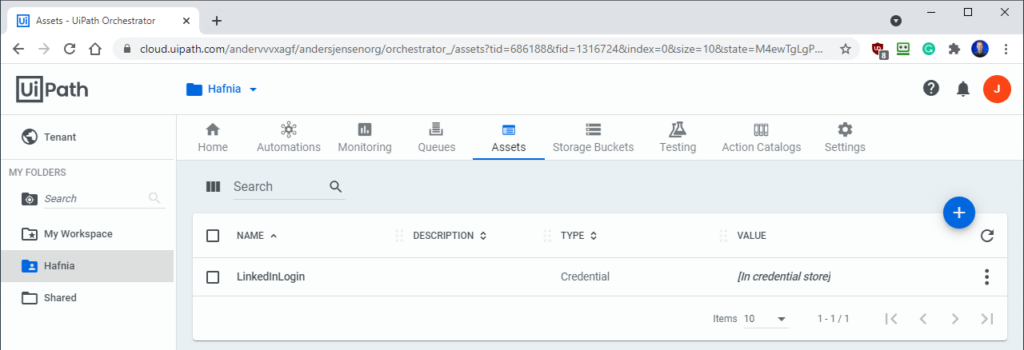
5. Your credential asset is now created and you can call it in UiPath by referring to its name "LinkedInLogin" (Fig. 4.10).
Robots
How to create an unattended robot
An unattended robot can run without the user starting the automation (clicking Start in the UiPath Assistant). The unattended robot can be started by a trigger (e.g., at a certain time, which can be recurring or when a new item has been added to an Orchestrator queue).
To create an unattended robot make sure you have:
- An unattended UiPath license (it's included in the community license)
- Established a connection between the desktop, you want to run the robot at, and Orchestrator
- Published your project to Orchestrator
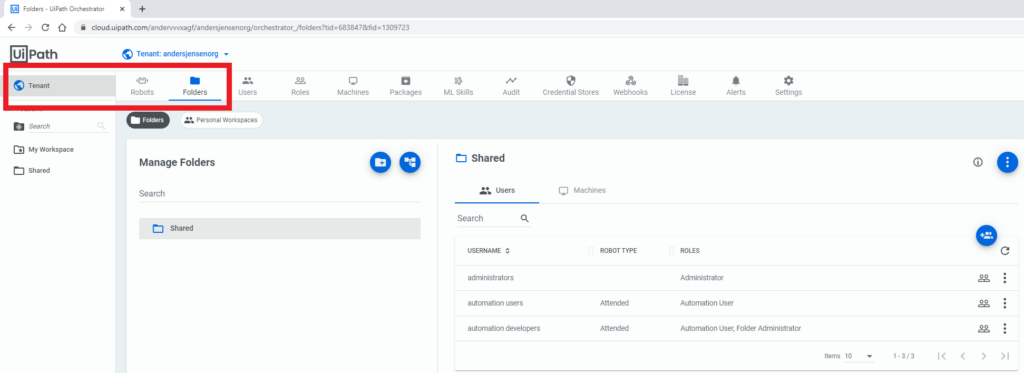
1. Click 'Tenant' in the upper right corner and then 'Folders' (Fig 5.1)
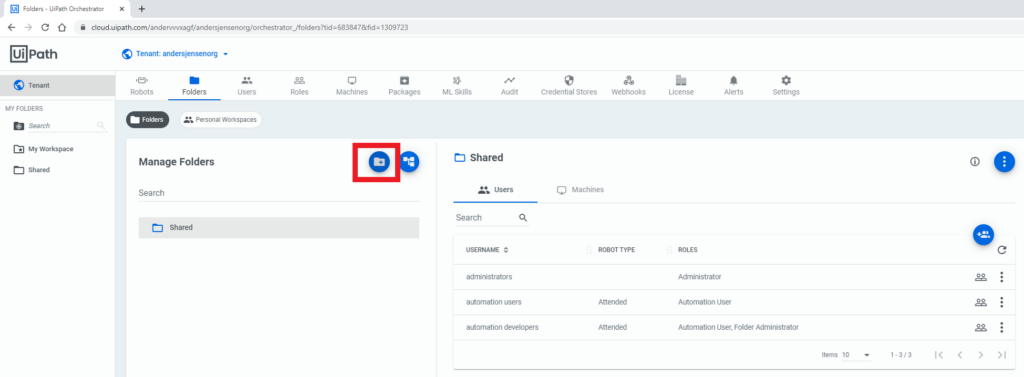
2. Create a new folder by clicking the icon showed in Fig 5.2.
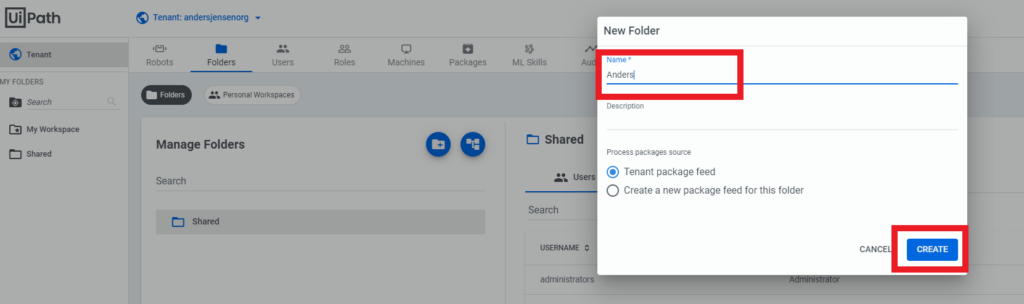
3. Give your folder a name you like and click 'Create' (Fig 5.3).
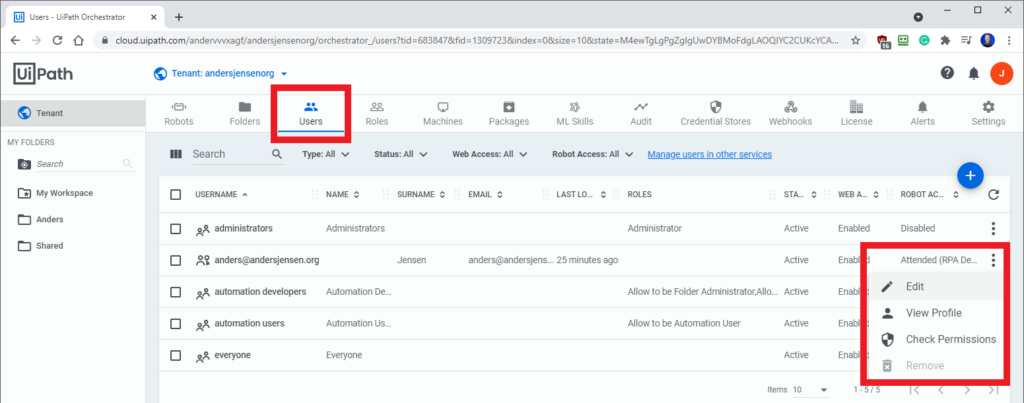
4. Click 'Users', find your user, click the three dots to the right and click 'Edit' (Fig 5.4).
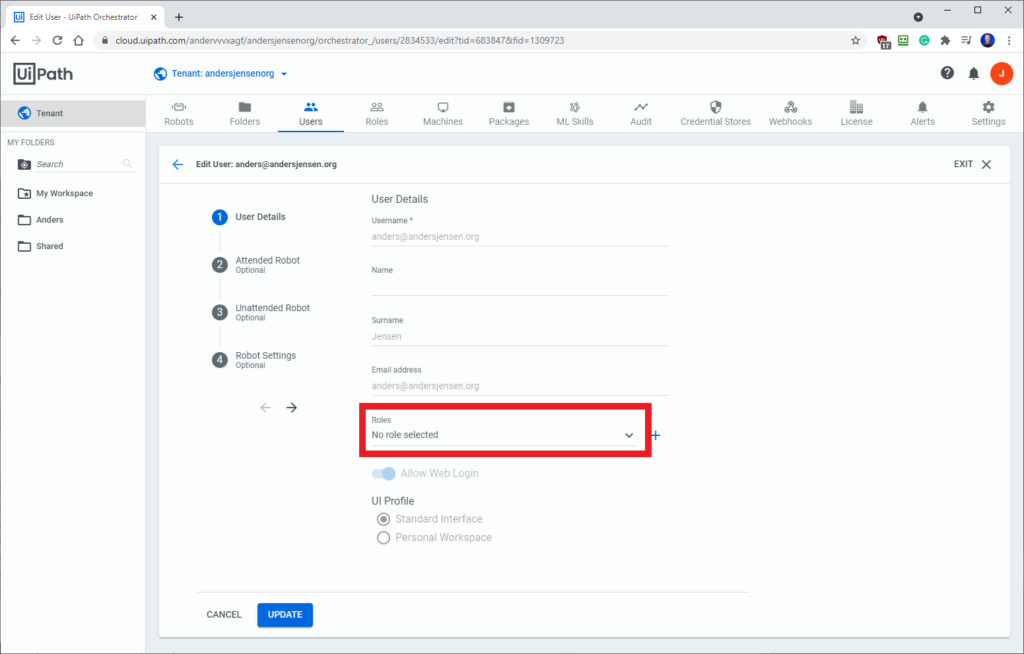
5. Click the 'Roles' dropdown (Fig. 5.5).
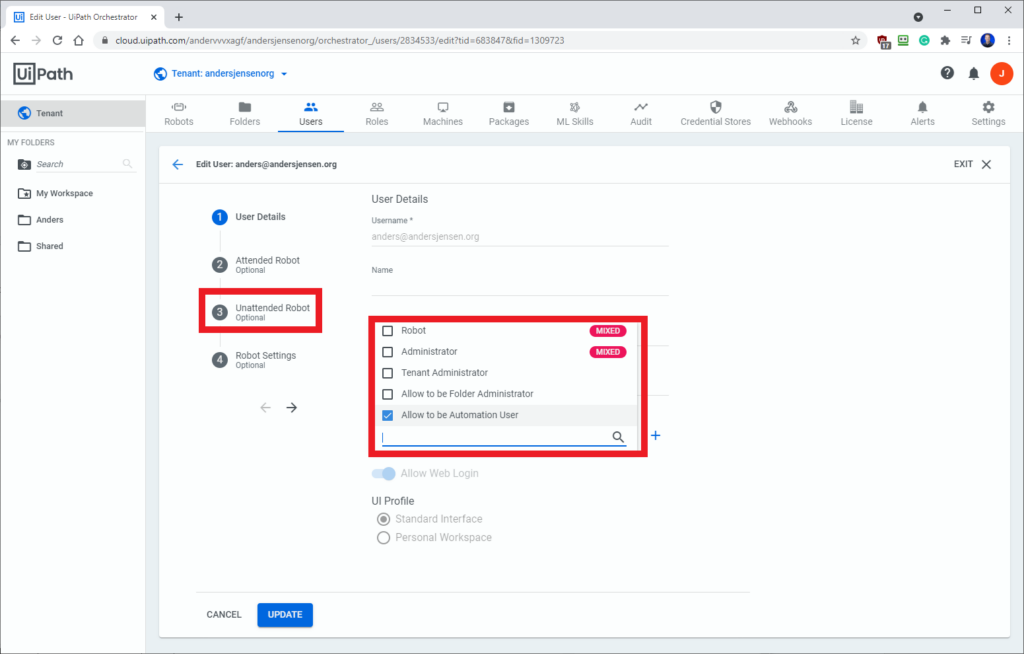
6. Tick 'Allow to be Automation User' and aftwards click 'Unattended Robot' (Fig. 5.6).
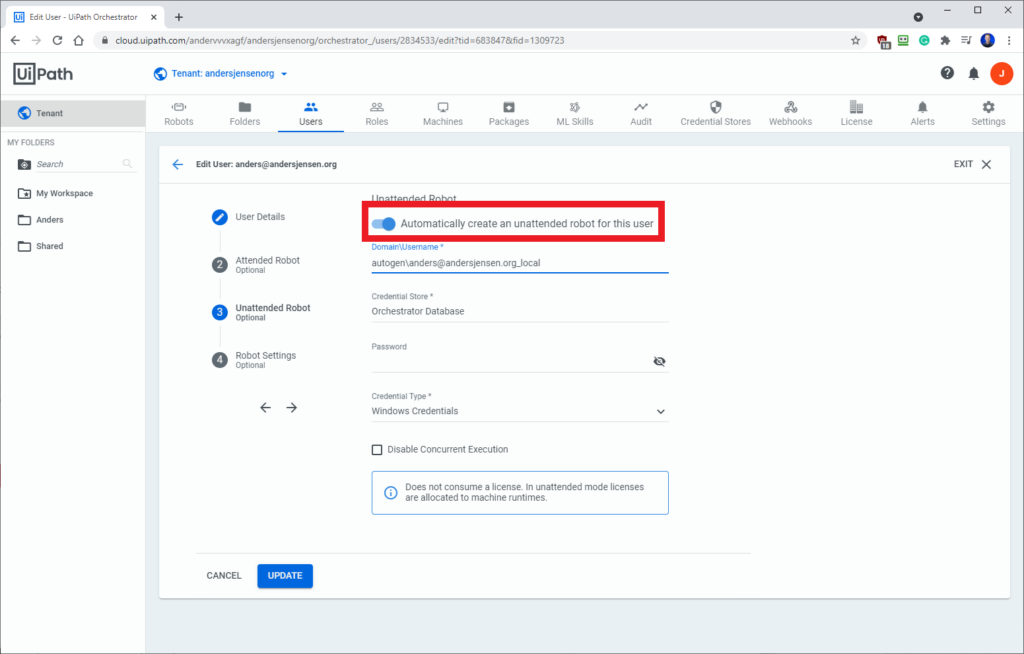
7. Slide the button at 'Automatically create an unattended robot for this user' so it becomes blue (Fig. 5.7).
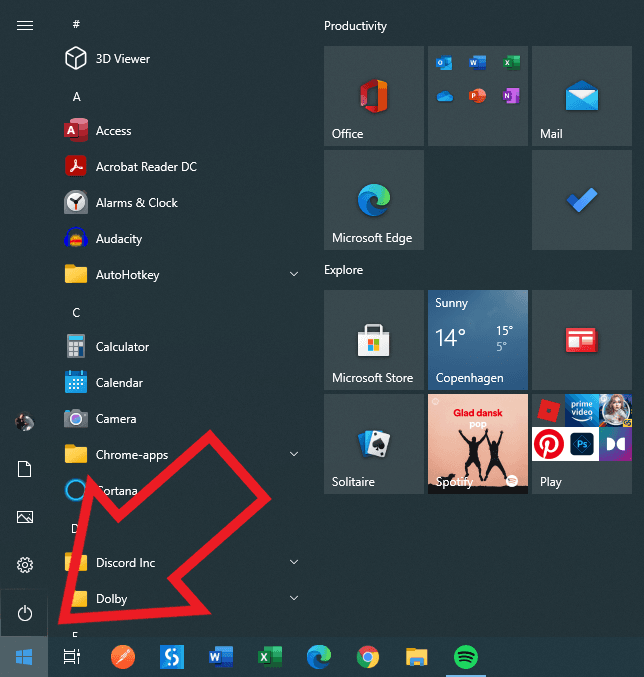
8. Now go to your start menu (Fig 5.8).
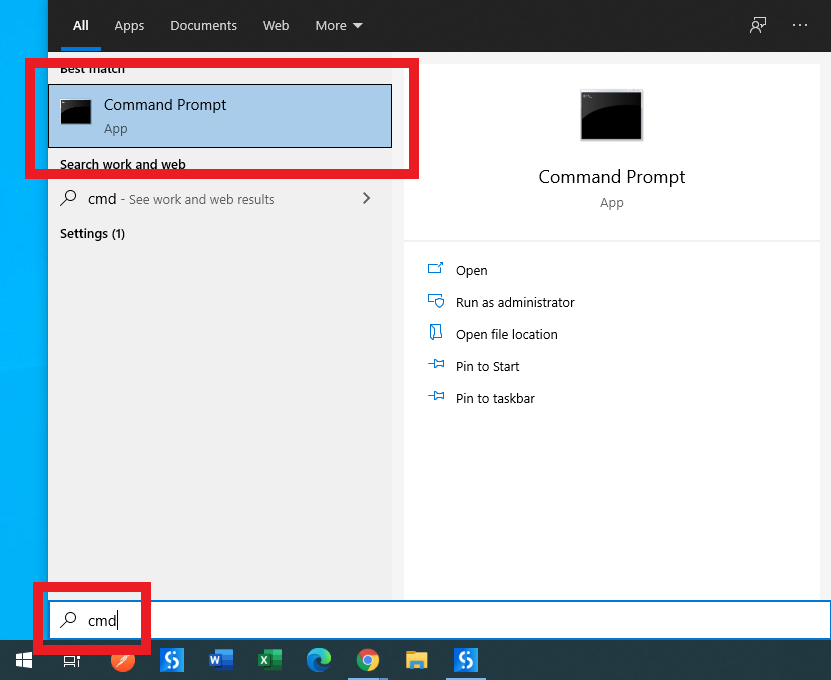
9. Search for 'cmd' and click to open it (Fig. 5.9).
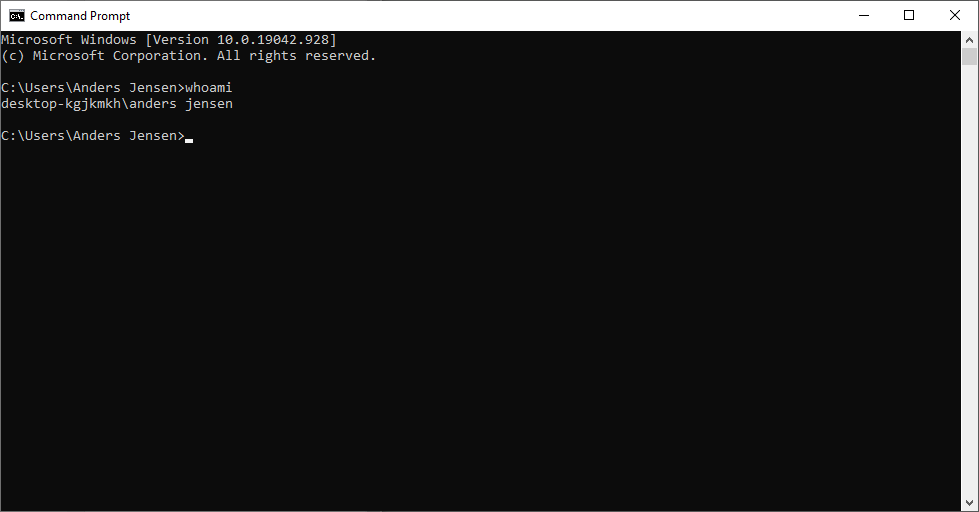
10. In the command prompt, type in "whoami" and click Enter. Underneath, select the 'desktop-kgjkmkhanders jensen' (yours will be named after your desktop) and copy it (ctrl+c) (Fig. 5.10).

11. Paste it (ctrl+v) into 'DomainUsername' and type your Windows password in 'Password'. Now you can click Update (Fig. 5.11).
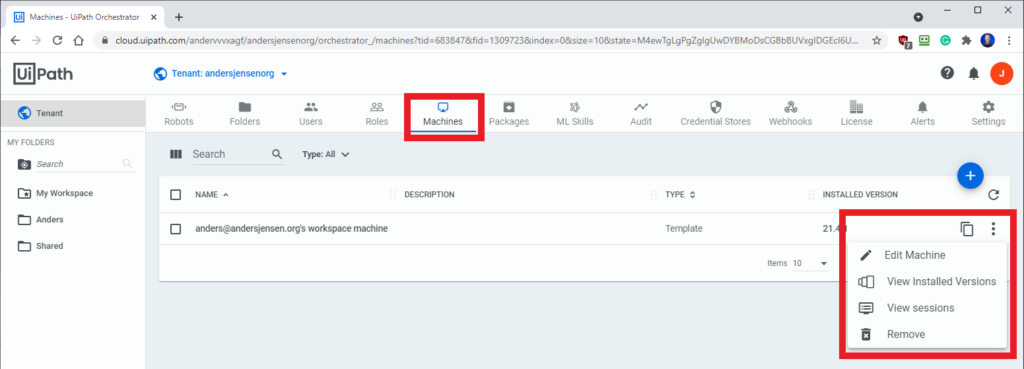
12. Click 'Machines', then the three dots to the right and 'Edit Machine' (Fig 5.12).
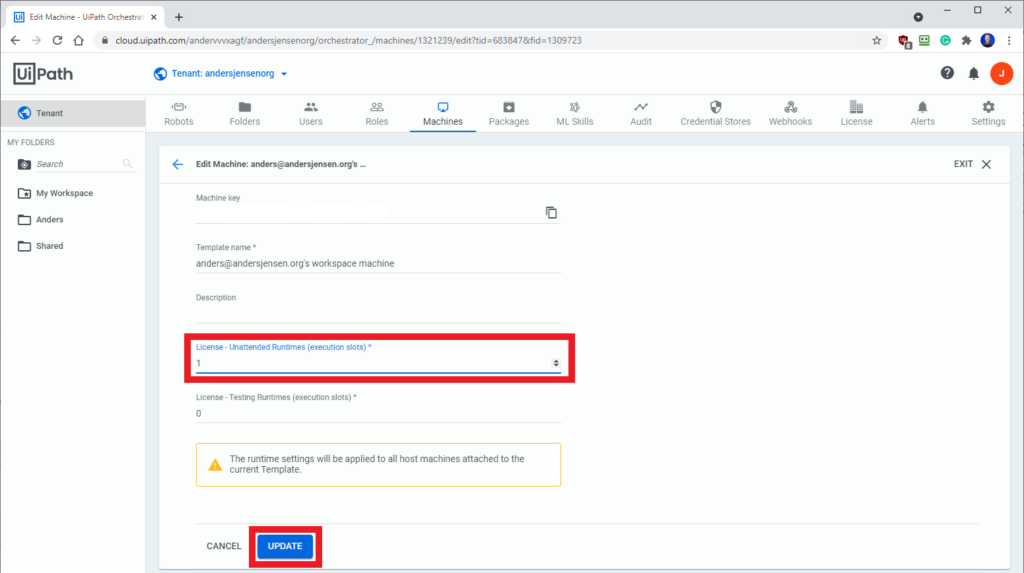
13. Assign an Unattended Runtime under 'License - Unattended Runtimes' by typing in 1. Click 'Update' (Fig. 5.13).
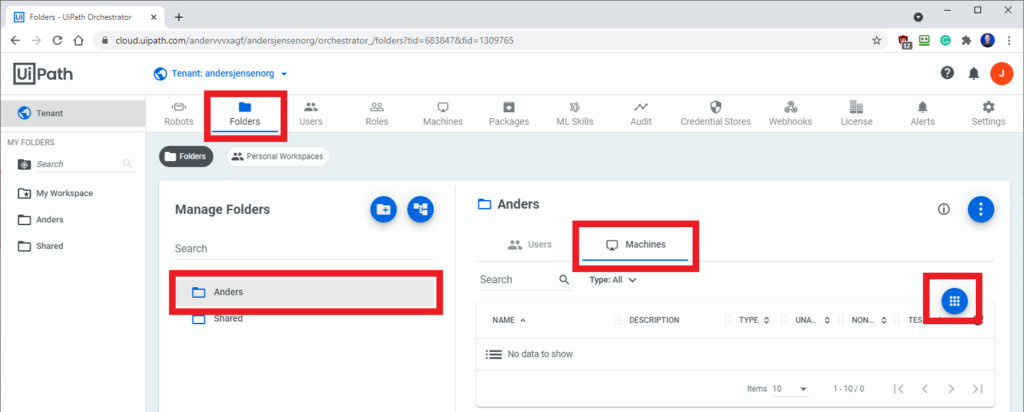
14. Click back to 'Folders', click 'Anders' (or your folder name), then 'Machines' and finally the 9 white dots on the blue (Fig. 5.14).
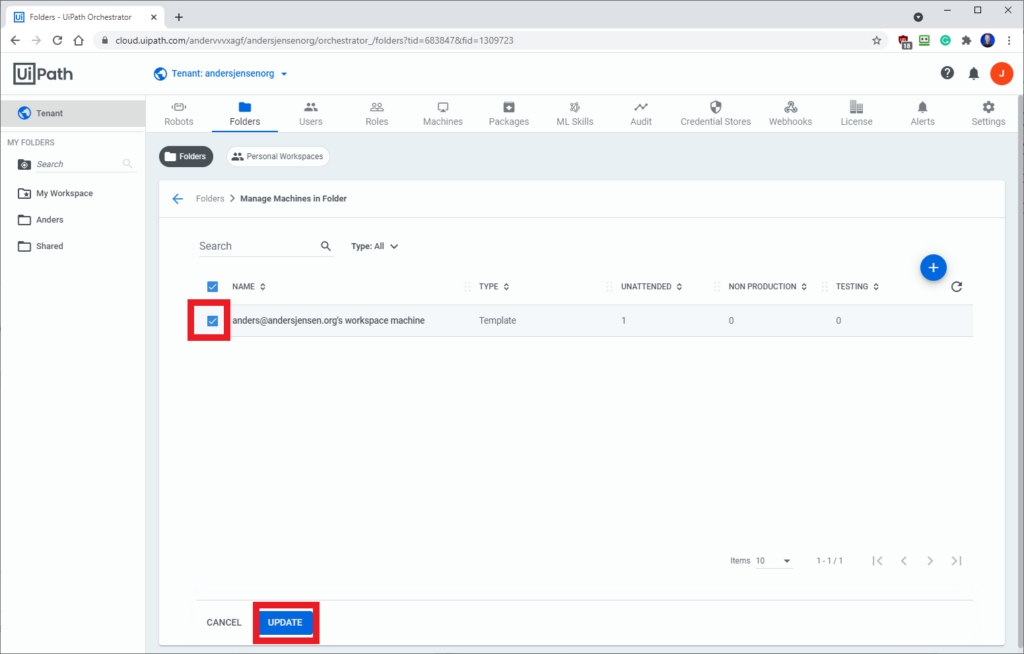
15. Tick the box next to your machine and click 'Update' (Fig. 5.15).
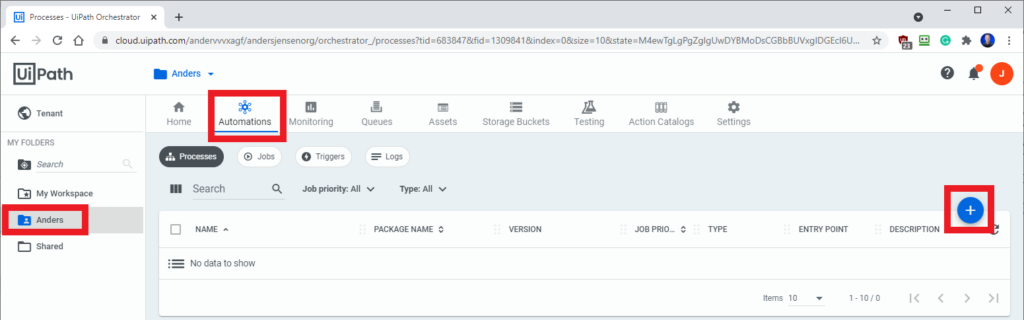
16. Click your folder, then 'Automations' and the '+' sign (Fig. 5.16).
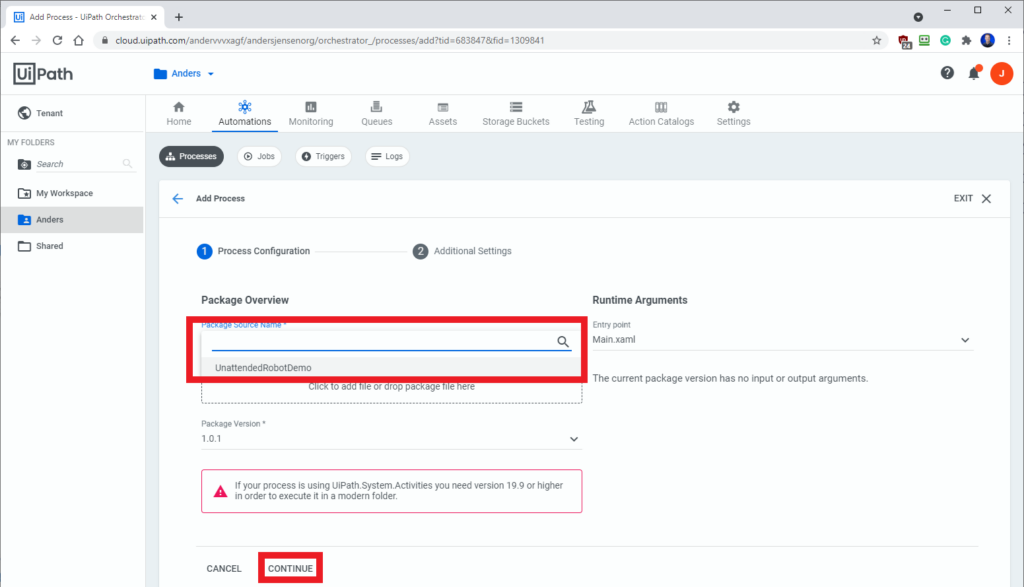
17. Choose the package you want to run and then click 'Continue' (Fig. 5.17).
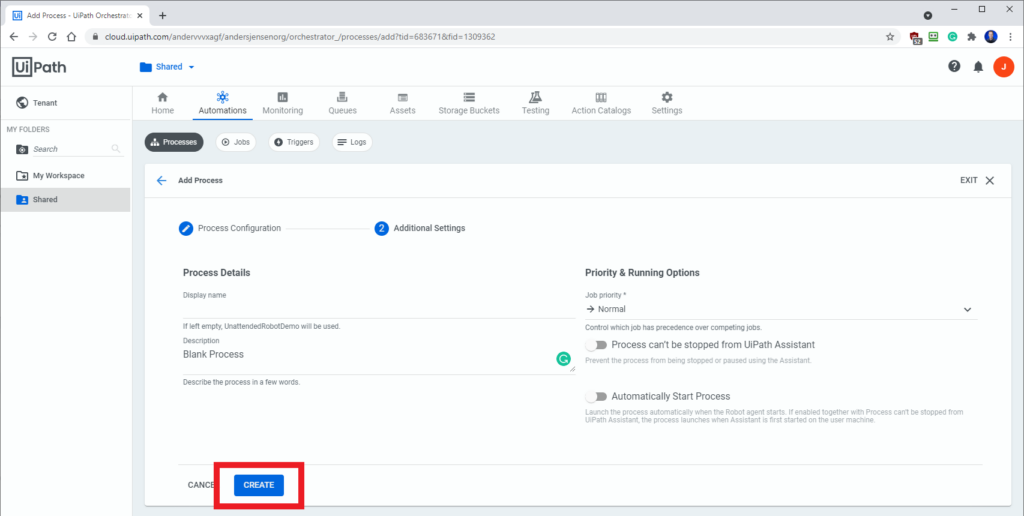
18. Click 'Create' (Fig. 5.18).
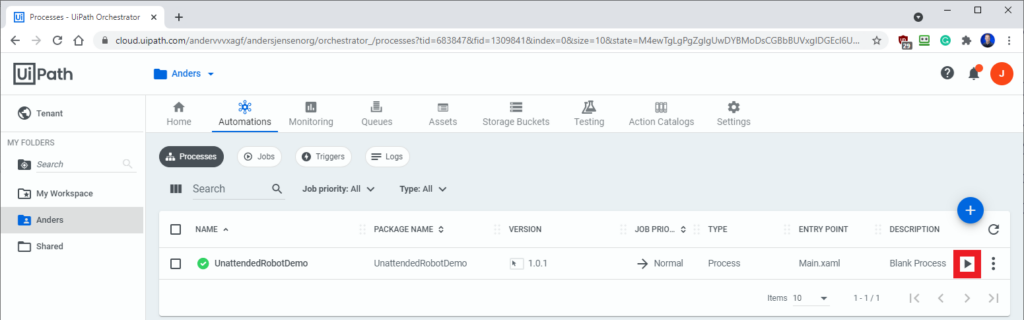
19. Click the play icon to run your unattended robot (Fig. 5.19).
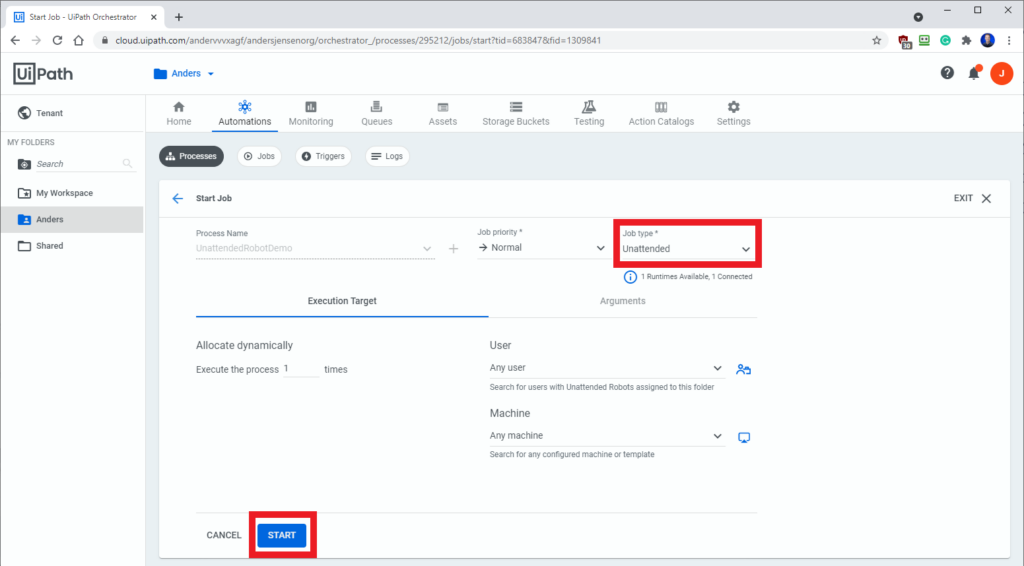
20. Make sure you have selected 'Unattended' in Job type and then click 'Start' (Fig. 5.20).
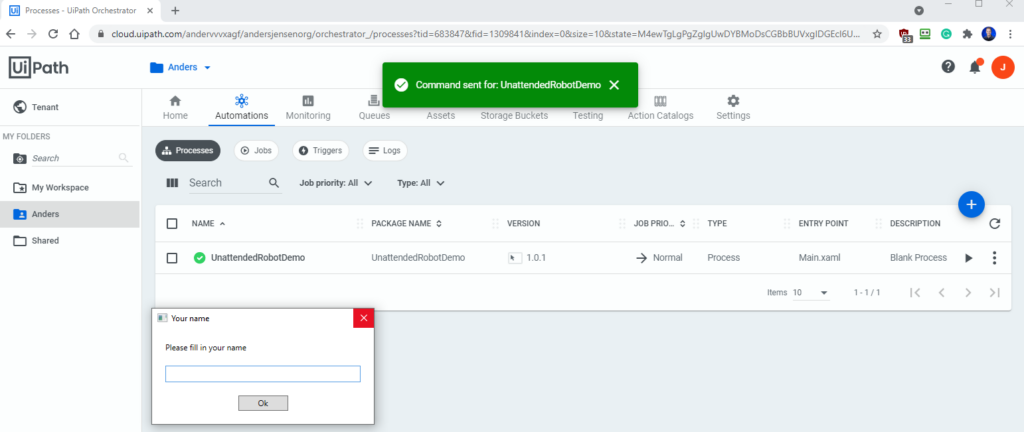
21. Congratulations, you've now made your unattended robot (Fig. 5.21).
Queues and Transactions
Connect with me
👪 Join the Discord Family: https://discord.gg/d8KQpTUvFD
--
Follow me on:
👉 LinkedIn: https://www.linkedin.com/in/andersjensenorg
👉 Twitter: https://twitter.com/andersjensenorg
👉 Instagram: https://www.instagram.com/andersjensenorg
👉 Facebook: https://www.facebook.com/andersjensenorg
👉 Discord: https://discord.gg/d8KQpTUvFD
💌 Email Newsletter: https://andersjensen.org/email-newsletter


